Would you like to learn how to download torrents anonymously with Vuze torrent client? Look no further.
This guide will teach you step-by-step which tools you can use to encrypt your torrent activity and hide your identity (unique IP address) from torrent spies and malicious peers.
* No torrent privacy method can get guaranteed 100% effective, but these techniques include the some of the most powerful and popular options for anonymization.
Covered in this guide:
- What’s the goal of torrent privacy
- What tools can you use
- VPN
- Proxy
- Seedbox
- How to set up a VPN with Vuze
- Recommended VPNs
- Configuring the VPN
- Recommended Vuze settings
- IP-bind/Interface bind (added security)
- How to set up a Proxy with Vuze
- What proxy type (use SOCKS!)
- Vuze proxy setup
- Adding encryption (optional)
Note: If you prefer another torrent client, we also have privacy guides for:
The Goal of Torrent Privacy (What does ‘anonymous’ mean?)
You may not realize it, but nearly all bittorrent downloads from public trackers (e.g. the Pirate Bay) are easily traceable by anyone with an internet connection.
In fact, there are even websites that monitor all downloads of the most popular torrent files from public trackers. One example is I know what you download.
To anonymize your torrents, you need to do two things:
- Change your public IP address so torrent peers don’t see your real IP
- Encrypt your torrents so your ISP can’t see what you download
Why you ask?
Whether you connect to a website or a torrent swarm, the computer(s) on the other end can see your IP address. It’s how they know where to send the information. If it’s a website, just the webserver logs you IP address, but if you’re downloading a torrent file? The entire swarm (all peers and seeders) can see your IP address.
Here’s a screen shot from a legal public domain torrent file in vuze:

We’ve blurred the last few digits of the IP addresses for the sake of privacy, but as you can see, you’re sharing alot more information about yourself on vuze than you may realize.
What can you do about this?
It’s pretty simple. You need to hide your real IP address from torrent swarms and encrypt your torrent traffic so your internet provider can’t directly monitor your downloads.
There are two tools you can use to do this:
- VPN (Virtual Private Network): Software/app that handles everything with 1-click
- SOCKS5 Proxy: Configured manually inside Vuze once, then works automatically.
Learn More: VPN vs. Proxy, which is better for secure torrents?
The rest of this guide will focus on setting everything up. I’ll walk you through both options and how to configure them properly in Vuze.
How to correctly use a VPN with Vuze
In this section you’ll learn how to:
- Choose the right VPN (Hint: one that doesn’t keep logs)
- install and connect to a VPN server in a torrent-friendly country
- Choose good settings and enable the kill-switch (prevent privacy leaks)
- (Optional) bind Vuze to the VPN interface to require a VPN connection
1. Choose a VPN
At a general level, most VPN services do the same thing. They route your traffic through an encrypted tunnel to a remote server (changing your IP address).
But that doesn’t mean all VPNs are created equally, and some take your privacy much more seriously than others.
For torrenting, you should only use torrent-friendly VPN services. These are companies that keep no logs whatsoever and explicitly allow BitTorrent on their networks.
Services we recommend:
- NordVPN (from $3.99/month)
- IPvanish (from $6.49/month)
- Private Internet Access (from $3.33/month)
All of these services are true ‘zero-log’ VPNs. Even better, all of them include SOCKS5 proxy access which you can use for the Vuze proxy setup later in this guide.
There are a few differences between them:
- If you want to access Netflix while connected to the VPN, get NordVPN
- If you want the fastest speeds choose IPVanish
- If you want the lowest price or port-forwarding (rarely needed) get PIA
2. Install the VPN software and connect to a server
One you sign up for a service, you’ll be able to download the VPN software from your account panel, or a download link may be emailed to you. All of these companies have software that works with Mac, Windows, iOS and Android.
Simply run the installer on your computer, then open the VPN software when it’s done.
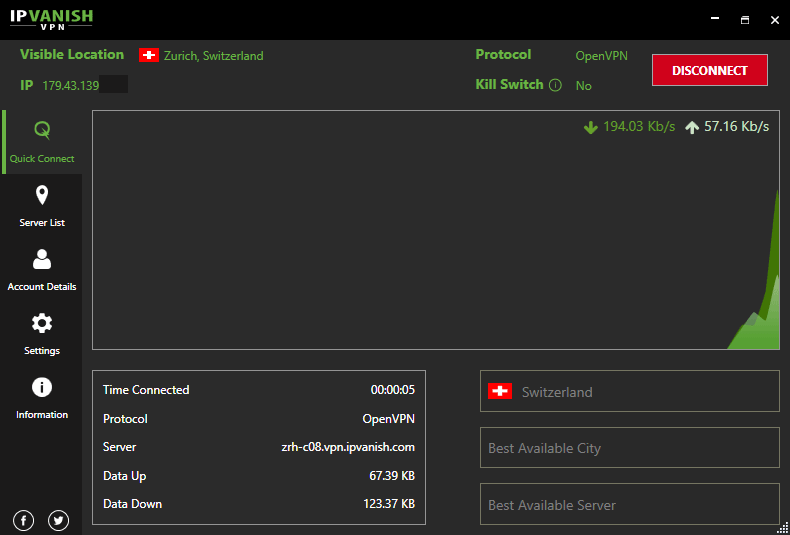
3. Configure VPN Settings & Kill-switch
The VPN software works fine right out of the box, but it’s a good idea to tweak the settings for even more privacy.
Our goal:
- Minimize the risk of privacy leaks
- Turn on the kill-switch (don’t expose your IP address to peers)
- Optimize speed
DNS and IPv6 Leak Protection
Some Internet Service Providers try to hijack DNS lookups, even when you’re connected to a VPN. This would allow them to spy on your browsing history. To prevent this, you’ll want to make sure you’ve enabled DNS leak protection on your VPN.
Some VPNs have this built into the software automatically, others make it a setting.
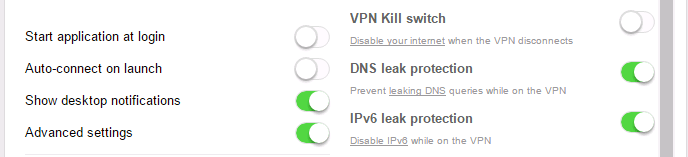
Turn on the Kill-Switch
The #1 leak that affects bittorrent users is if your VPN accidentally disconnects. This can expose your real IP address when your torrent client reconnects to peers using your unprotected internet connection.
A Kill-Switch is the ideal solution. An option in most VPN software, the kill-switch prevents internet access until you reconnect to the VPN. Just look for it in the VPN settings.

To find a killswitch-enabled VPN read: Our VPN Killswitch guide.
Improve Speeds
There are several factors that impact your speeds when torrenting on a VPN:
- Server load: how many users sharing the bandwidth
- Server Distance: packets get lost/slowed if server is far away
- Encryption Strength: 128-bit encryption is faster than 256-bit
So try to connect to the closest torrent-safe location. If your VPN provider has a load-balancing feature, use it to find less crowded servers. Finally, try using 128-bit encryption if your VPN provider has it available.
Private Internet Access is one service with adjustable encryption strength.
Vuze Interface Binding (extra security)
Vuze has it’s own built-in killswitch feature called ‘Interface Bind‘ which will force Vuze to use a specific network interface (the VPN) to connect to the internet. If the VPN goes down, so does Vuze’s network connection.
You can use the feature either with or instead of your VPNs own killswitch. It is a little tricky to set up, but once you get it right you can set-and-forget it.
How to Bind Vuze to the VPN interface
Detailed instructions on how to set up Vuze Interface binding can be found in the video below, starting at 11:48.
And here is our written guide if you prefer…
Step 1: Connect to your VPN
Connect to your VPN service exactly how you would normally. This will help us find the right interface to bind to in a later step.
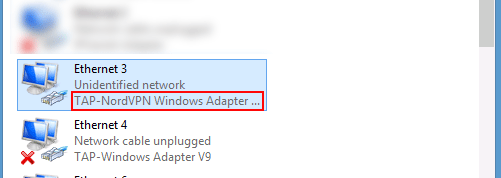
Step 2: Find out what your VPN connection is named
Go to the Network Adapter settings in the control panel, and check your active network connections. If you’re not sure which one is the VPN, right-click and hit status to see how long it has been connected. If you recently started the VPN, you should see a short connection duration.
In my case, it was Ethernet 3 (yours will be different). Then note the label below the interface name. That’s what we’ll look for. In this example, mine was: TAP-NordVPN Windows Adapter
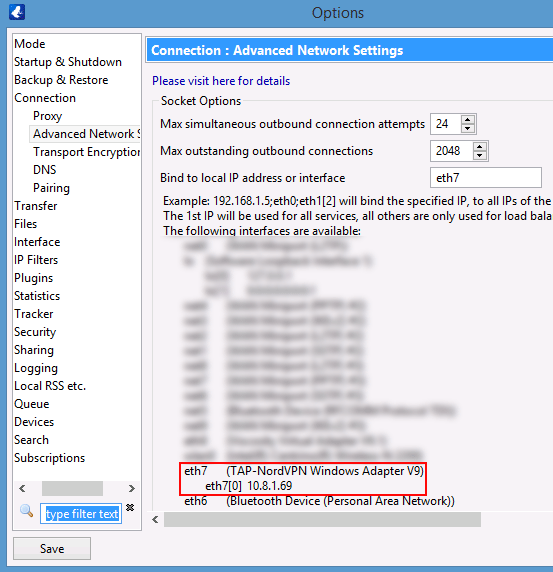
Step 3: Set the binding interface in Vuze
In Vuze, go to: Menu > Tools > Options > Connection > Advanced Network Settings
Then scan the list of interfaces for the one that most closely matches the label we found in step 2. It may take a couple tries to guess the right one as there are often multiple with similar names.
In my case, it turned out to be eth7. (Yours will be different).
Step 4: Test your Settings
We need to test if you’ve selected the correct interface. Here’s what to do:
- Make sure you’re connected to the VPN
- Type your interface name in the box ‘Bind to local IP address or interface‘
- Click Save
- Check if the routing indicator has turned Green
The routing icon will now appear on the bottom bar of Vuze. It looks like a 3-way pipe and will either be Red or Green.
If it’s Green, congrats you’ve set it up correctly. If it’s Red you’ve bound to the wrong interface and need to try again.

How to use Vuze with a Proxy
You may prefer to use a proxy instead of a VPN (or use them both together). In this section we’ll show you the right way to setup a proxy in Vuze.
Important: Make sure you’re using a SOCKS5 proxy. Vuze will ignore an http proxy for peer connections. The entire point is to make sure the tracker and peers don’t see your can’t see your IP address. If you need a proxy service, these are the best SOCKS proxies for torrenting.
1. Subscribe to torrent-friendly proxy service
If you don’t already have a SOCKS5 proxy subscription, you’ll need to get one. My suggestion is to simply subscribe to a VPN provider that includes a SOCKS5 proxy with your VPN plan.
Recommended SOCKS proxy providers for torrenting:
2. Get your Proxy Credentials
To setup the proxy inside Vuze, you’ll need a few pieces of information.
- The address of the proxy (can be domain name or IP address)
- The port number used by the proxy
- Your username
- Your password
Important Note: IPVanish, Private Internet Access, and several other VPN services let you generate a unique login/password combo for the SOCKS proxy. It’s not the same as your VPN credentials (you do this in your account on their website).
Here are the settings for the most popular services among our readers:
NordVPN has more than 10 p2p-enabled SOCKS server locations and more than 100 unique server addresses. You can choose one from their servers page or just use the one below.
- Proxy Address: nl380.nordvpn.com
- Port: 1080
- Username/Password: same as VPN
- Proxy Address: proxy-nl.privateinternetaccess.com
- Port: 1080
- Username/Password: Generated in your account panel
- Proxy Address: ams.socks.ipvanish.com
- Port: 1080
- Username/Password: Generated in your account panel
- Proxy Address: proxy.torguard.org
- Port: 1080, 1085 or 1090 (use any)
- Username/Password: Generated in your account panel
3. Vuze Proxy Settings
To access Vuze proxy settings, go to:
Menu > Tools > Options > Connection (expand tab) > Proxy
Then fill in the proxy details specific to your service as shown below:

Note: Make sure to enable the proxying of both Tracker and Peer communications. We want to ensure that both trackers and peers can only see our spoofed (by the proxy) IP address.
4. Verify your proxy settings
After saving and restarting Vuze, you can try the ‘Test SOCKS’ button but I find it to be a little glitchy. A better method is to check your torrent IP address with a tracking torrent.
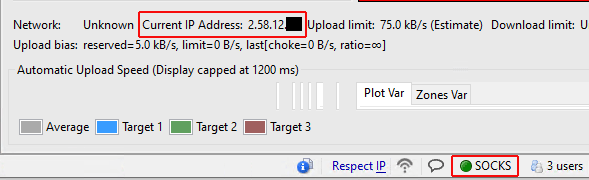
Here are two more things you should do inside Vuze:
- Verify that the SOCKS indicator on the status bar is Green
- Check Vuze’s public IP address by double-clicking the SOCKS icon
5. Add Encryption
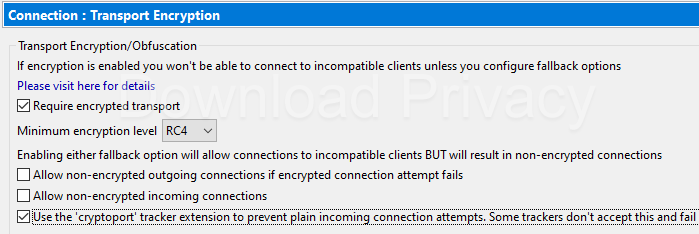
Most SOCKS proxies don’t have an encryption layer (unless it’s BTGuard). But you can still add lightweight RC4 encryption within Vuze:
- Go to: Tools > Options > Connection > Transport Encryption
- Select Require Encrypted Transport
- Set encryption level to RC4
- Set the other options as shown below:
For more info: Read our BitTorrent Encryption Guide
Troubleshooting
Sometimes things don’t work as planned. The most frequent issues occur when configuring a proxy in Vuze. If all else fails, just go back to using your VPN instead. It’s simply more reliable (and more secure).
Here are some common problems:
Routing indicator won’t turn Green (interface binding)
- Make sure the VPN is connected
- Make sure you’ve selected the right interface (and it hasn’t changed)
- Make sure you’re not using a proxy. Binding works with VPN ONLY.
Can’t open magnet links
This usually occurs when using a proxy in Vuze. The reason can vary but some proxy services simply don’t configure their servers to handle magnet links properly. There are a couple things you can try:
- Specify backup DNS in Vuze Options > Connection > DNS
- Make sure DHT is enabled
- Download the .torrent file directly (instead of Magnet)
- Use the VPN instead (last resort)
Slow Speeds
- Check your bandwidth limits in Options > Transfer
- Make sure you don’t have IP filters enabled
- Make sure DHT is enabled
- Connect to a different VPN server
Also read: Slow Torrents & how to fix them.
Summary & Next Steps
There 2 effective methods to increase your privacy while torrenting with Vuze.
- Virtual Private Network (VPN)
- SOCKS5 Proxy
Of the two, the VPN is the more secure option. It has incredibly strong encryption, is easier to use, and there is a lower chance of incorrect setup or serious security leaks.
Many VPN services that we recommend include a SOCKS5 proxy at no additional charge, so you can use both the VPN and proxy together if you want. This allows you to keep your torrent traffic on a separate IP address from the rest of your internet activity.
Further Reading: