A SOCKS5 Proxy lets you easily hide your torrent IP address on your Android device, without sacrificing speed. It also allows you to route your torrent traffic separately from the rest of your data.
This step-by-step guide will show you how to:
- Choose the right proxy service
- Find a compatible Android Torrent Client
- Properly configure your Android torrent client to work with the proxy service.
- Verify that the proxy is working properly and check your torrent IP addresss.
Note: there are currently only 2 Android torrent clients with build in proxy support (Flud, and tTorrent). This guide has setup instructions for both.
Make sure you also read: How to download torrents anonymously on Android
STEP #1 – CHOOSE AN ANONYMOUS SOCKS PROXY SERVICE
Only a few VPN/Proxy providers offer the key features you’ll need for secure downloads.
The most important features you’ll want are:
- A ‘Zero-Log’ privacy policy
- Fast Download Speeds
- Proxy server located in a torrent-friendly country
By choosing a service with all 3 of these features, you’ll be able to avoid problems down the road. It’s way easier to choose wisely the first time.
Our Favorite Non-Logging Proxy Services are:
Private Internet Access (VPN + SOCKS Proxy)
PIA was named our ‘Best Torrent VPN of 2014‘ and they’re a option for anonymous SOCKS proxy service as well. Why? Because PIA includes a Netherlands-Based SOCKS proxy with every VPN purchase. That means you get both VPN and proxy access for as low as $3.33/month (1 year subscription).
NordVPN
NordVPN is an all-in-one VPN + proxy service (based in Panama). You get access to all their VPN servers in 50+ countries as well as non-logging SOCKS5 servers in 30+ locations.
Best Offer: NordVPN plans start from $3.49/month
STEP #3 – GENERATE PROXY LOGIN/PASSWORD (PRIVATE INTERNET ACCESS)
If you’re using NordVPN, you can skip ahead to the proxy setup instructions. If you’re using PIA, you’ll need to follow the steps below to generate a unique username/password for the proxy server.
If you are using Private Internet Access as your proxy provider, follow these steps to get your login credentials:
Step #1:
Login to your Private Internet Access account by using the username/password that were emailed to you when you purchased your PIA subscription.
Use the link above (Login) then scroll down the page to find the client Sign-In Box (Lower Left)

Step #2
- Once in the client control panel, scroll down to find the “PPTP/L2TP/SOCKS Username and Password” box.
- Click the ‘Generate Username and Password’ Button
- Leave the window open to copy the new login details in a future step.
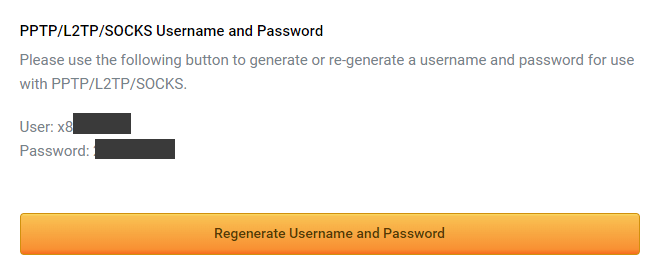
Click the button to generate a new Login/Password Combo
STEP #4 – MAKE SURE YOU HAVE ALL REQUIRED INFORMATION
To configure your proxy server with your Android Torrent Client, you need:
- Username/Password
- Proxy Type (This will be ‘SOCKS5’)
- Proxy Server Address
- Port #
For Private Internet Access:
- Login/Password – You should have generated this in step #3 above
- Proxy Type = SOCKS5
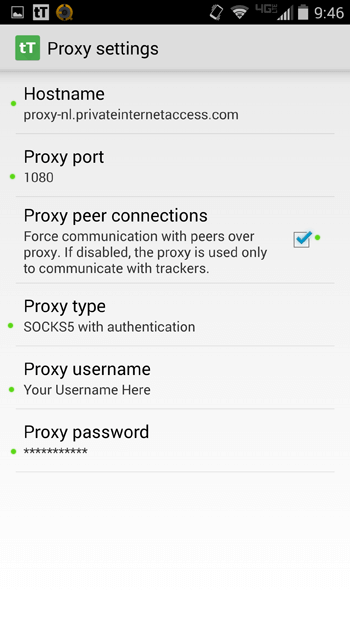
- Proxy Address = proxy-nl.privateinternetaccess.com
- Port # = 1080
For NordVPN:
For a custom SOCKS server location, follow the setup instructions on their site.
For demonstration, here’s a setup using a Netherlands server location:
- Username/Password: same as your VPN account
- Proxy Type: SOCKS5
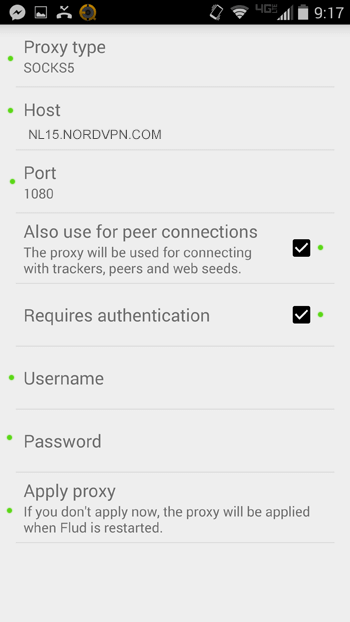
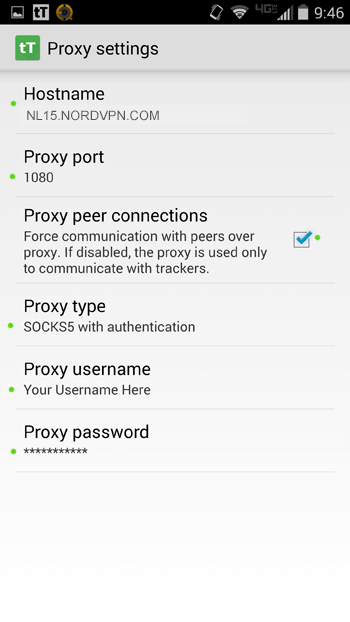
- Proxy Address: nl15.nordvpn.com
- Port #: 1080
STEP #5A – CONFIGURE SOCKS PROXY (FLUD)
Here’s how to setup Flud to use your SOCKS Proxy:
Flud Proxy Setup Instructions:
- Open Flud
- Go to Menu > Settings > Network > Proxy Settings
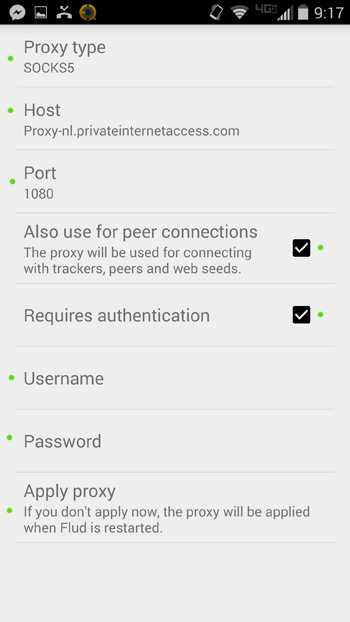
- Enter the settings as shown below (PIA setup is shown. Obviously substitute Torguard Info for Torguard)
- Make sure to check both boxes (‘Use proxy for peer connections’ and ‘Requires Authentication’)
- Enter your Username/Password in the appropriate box
- Click ‘Apply Proxy’
- Done!
Flud settings for PIA
Flud settings for NordVPN
STEP #5B – (tTorrent Proxy Setup)
How to configure your SOCKS proxy for tTorrent…
tTorrent Proxy Setup:
- Open tTorrent
- Open the Menu (Top Left)
- Go to: Menu > Settings > Network Settings > Proxy Settings (Section)
- Click the checkbox ‘Use Proxy’
- Click ‘Proxy Settings’ (Under the ‘Use Proxy’ option)
- Enter your Hostname, Proxy Port as shown
- Make sure to click ‘Proxy Peer Connections’
- Proxy type = ‘SOCKS5 with Authentication’
- Enter username/password
- Done!
STEP #6 – VERIFY YOUR ANONYMITY
We demonstrate this step using Flud, but you can do the same thing using tTorrent.
The purpose of this step is to verify your torrent IP address is different than your browser ip address. To do this we will use a cool (free) tool provided by Torguard, that downloads a tiny torrent file that displays your Torrent IP address from inside your torrent client. We will compare this to the IP address of your web browser to make sure they are different.
Step 6a – Check your Browser IP address
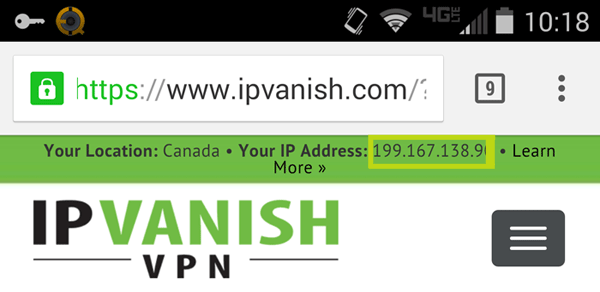
Click or type the following link into your android web browser: (redirects to IPVanish’s IP check tool)
At the very top of the webpage you should see something like the image below (except it will show your browser IP address, not mine).
Step 6b – Download The Torrent IP Check Tool
This tool is just a small PNG image torrent that is custom generated just for you (so it can be tracked individually). To download the tool:
- Using the web browser on your Android device go to – www.vpnlinx.com/iptorrent
- This will redirect to the torrent IP check tool
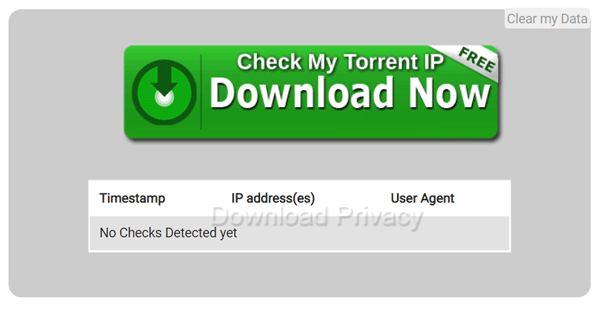
- Click the ‘Download Now’ button (as shown below). This will open the torrent file in Flud
Step 6c – Check your Torrent IP in Flud
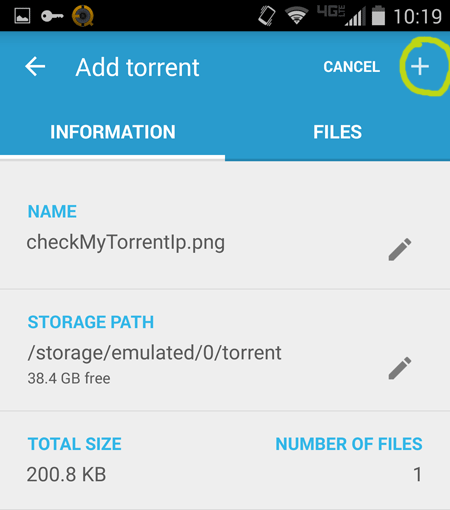
After you click the ‘Download Now’ button, it will bring up the ‘Add Torrent’ dialog in Flud. If you have multiple torrent apps installed, you may have to specify that your phone should open the torrent using Flud.
The add torrent screen looks like this. Click the ‘+’ symbol in the top right corner to add the torrent:
Once you successfully add the torrent, you should now see this:
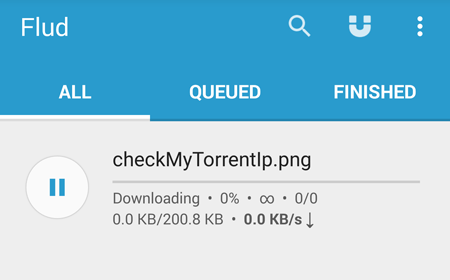
You’ll be taken to the status tab of the torrent. Now click on the ‘Trackers’ tab.
In the trackers tab, you’ll be shown this screen. It will display the http address of the checkmyip tracker, and it will also show your IP address.
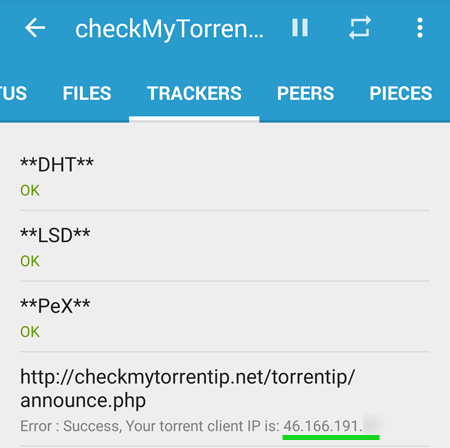
Understanding the results
There are 3 different scenarios when you get to this final step. Here’s what they mean…
Scenario #1 – Your Torrent IP and Browser IP are Different
CONGRATULATIONS! You set everything up perfectly, and the proxy is working properly. Your torrents are now anonymous.
Scenario # 2 – Your Torrent IP and Browser IP are the same
Hmmm. This means your peer connections aren’t being routed through the proxy. Go back to step #5 and make sure you checked all the boxes.
Scenario # 3 – You get a proxy connect error
Wait. Before you panic…
- Exit your torrent App
- Put your phone into airplane mode (or better yet restart it).
- Wait 30 seconds
- Turn airplane mode off
- Open your torrent app and check the IP again
If you still get a connection error…
You must have misconfigured your proxy settings. Go back and double check your login/password (If you’re using PIA, did you generate a proxy password inside your PIA account panel?).
Also make sure you have the proxy address and port exactly right.
Once you get the settings right, it should start working. It’s best to restart in between attempts to make sure you don’t get a false-negative.
If worse comes to worse, you can always contact tech support for your chosen proxy provider.
Summary and final tips:
Using a SOCKS proxy is a good way to anonymize your torrents on Android devices (if you don’t need full VPN encryption).
Just remember to follow these guidelines when setting everything up:
- Always use a SOCKS proxy (if you use HTTP(s) proxies, peers will see your real IP
- Make sure to choose a non-logging proxy service like NordVPN
- Use a compatible torrent app (tTorrent and Flud are proxy-compatible)
- Check your torrent IP address to make sure your setup is working
If you’ve got any questions about this guide or you have additional tips to share, make sure hit up the comments!
