qBittorrent is the best free torrent client in the world (for me at least) and a fantastic alternative to bloated clients like uTorrent and Vuze.
However, like all torrent clients, qBittorrent exposes your real IP address to torrent peers and trackers when downloading torrents. Because of this (unavoidable) feature of the BitTorrent protocol, smart torrenters will use qBittorrent with a VPN.
In fact, a high-quality VPN is the best torrent privacy tool there is. Using a VPN has several key benefits including:
- Hide your real IP address from torrent peers
- Encrypt 100% of your torrent traffic
- Avoid torrent throttling
- Geo-locate your connection is a torrent-friendly country
In this guide, I’ll show you how to choose and properly setup a VPN with qBittorrent.
You’ll learn:
- The best qBittorrent VPNs to use
- The correct VPN settings to use
- How to bind qBittorrent to your VPN connection
- and more.
Let’s dive in.
Choosing a VPN for qBittorrent
The first thing you’ll need is a reputable VPN service that allows torrenting. If you don’t have a VPN subscription already, these are the best VPNs for qBittorrent:
Best qBittorrent VPNs
- NordVPN – An all-around excellent VPN that supports the faster Wireguard protocol for speed-optimized downloads. They don’t block seeding, have p2p-optimized server locations, and include a SOCKS5 proxy in multiple locations.
- Private Internet Access – One of our favorite VPNs for more than a decade. PIA offers nearly identical features to NordVPN though speeds are not as fast and there are fewer server locations. I like their software client better, however.
- Surfshark – Owned by the same company as NordVPN, Surfshark gives you 90+ server locations, Wireguard, and p2p-allowed on all servers. It’s like NordVPN lite at a more affordable price point. No SOCKS proxy included (only negative).
Don’t worry too much about which one to choose. They’re all excellent. NordVPN is the most expensive and Surfshark is the cheapest, so just choose the best VPN that fits your budget.
Setting up the VPN for qBittorrent
The first step after you sign up for an account is to download and install the VPN software on your device. Each of the 3 VPNs above has a custom VPN app for Windows, Mac, Android, FireOS and iOS devices.
Once logged in to the software, locate the client settings either from the menu or by clicking the settings cog (will vary by service).
Here we’ll demo the optimal setup using Private Internet Access, but most VPNs will have similar settings available.
Choose the fastest VPN Protocol
Recommended: Wireguard > IKEv2 > OpenVPN
As strange as it sounds, torrenting is not a high-security VPN usage. That means that you can sacrifice a small amount of encryption strength in exchange for faster speeds and better performance.
That’s why we recommend Wireguard which is a newer, lighter protocol that consistently outperforms 256-bit OpenVPN in our testing with qBittorrent.
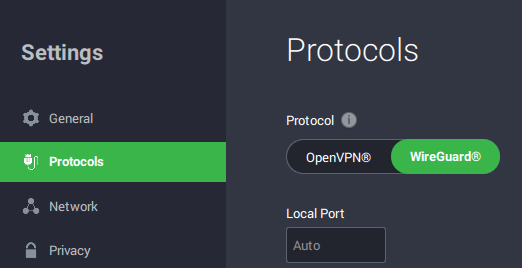
If your VPN doesn’t support Wireguard, go with IKEv2 or IPSec if available. If not, use the lowest-strength OpenVPN encryption available (e.g. 128-bit AES).
Enable the Kill-Switch
Most VPN software includes a kill-switch. This is a failsafe device that will disconnect your internet if the VPN fails unexpectedly.
Using a kill-switch is recommended for qBittorrent because it will prevent your real IP address from accidentally leaking (becoming visible) to torrent peers.
To activate, simply go to the VPN settings and enable the kill-switch feature (see below).
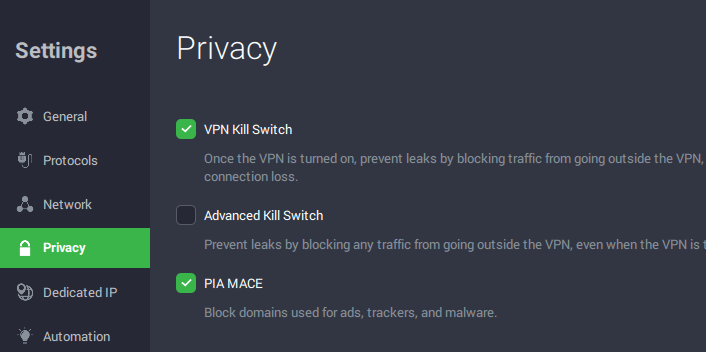
Note: If you’re going to follow the step below to bind qBittorrent to the VPN, the kill-switch is unnecessary.
Learn More: How to use a VPN Kill Switch
Choosing a Server Location
Your VPN likely gives you multiple (often dozens) of server locations to choose from.
Even though nearby servers are often the fastest, you may want to consider choosing a further server location in a more torrent-friendly jurisdiction.
This is less important when using a zero-log VPN since there is no stored metadata to link your torrent activity to your VPN-assigned IP address. That said, if you wish to reduce scrutiny on your torrent activity, it can be a good idea.
First off, if your VPN provider restricts torrent activity to specific servers, make sure you’re using p2p-approved locations.
After that, consider connecting through torrent-friendly jurisdictions like these:
Best Countries for Torrenting:
- Spain – Downloading for personal used allowed
- Switzerland – Downloading for personal used allowed
- Netherlands – ISPs don’t forward demand letters. High volume of torrent traffic here.
Learn more: The Safest Countries for torrenting
Bind qBittorrent to your VPN
If you’re serious about secure torrenting, don’t skip this step.
qBittorrent has a special feature that allows you to bind its internet connection specifically to your VPN adapter. It functions like an advanced kill-switch specifically for qBittorrent.
By enabling VPN binding in qBittorrent, the app wont’ be able to access the internet or connect to peers unless you are connected to the VPN.
It’s quite simple to set up and in our testing is even more reliable than your VPN’s own kill-switch.
1. Open qBittorrent Advanced Settings
The VPN-binding feature is located in qBittorrent’s advanced settings panel. You can access it at:
Tools > Options > Advanced
2. Choose Interface or IP binding
qBittorrent allows you to bind its connectivity to either a network interface or a specific IP address. Unless your VPN uses a static IP address, you’re better off binding to an interface to it will continue to work each time you’re assigned a new IP address.
In this example, I’ve chosen the Wireguard interface of my Private Internet Access software.
If you’re having trouble figuring out which interface to use, see the next step.
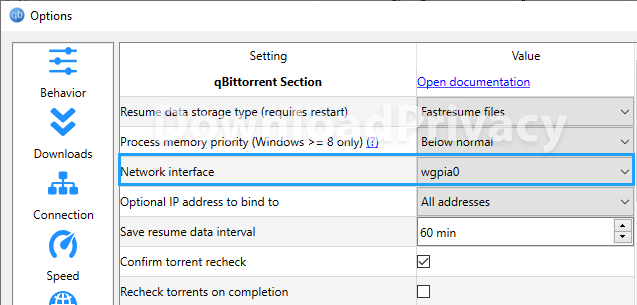
Recommended: Bind to Interface
3. Identify the correct Network Interface to bind to
We need find the network interface that belongs to your VPN. It’s actually quite easy to do this, even if you have a bunch of network adapters installed (like I do).
- First, make sure your VPN connection is active
- Open the Network Connections panel on your system
If you’re using Windows 10 or later, go to Start > Settings > Network & Internet > Change adapter options
Then you’ll see something that looks like this:
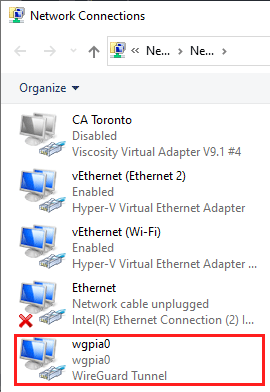
You can right-click on each available interface to see the status and data transfered to help narrow down which one is active. If using Wireguard look for ‘WireGuard Tunnel’ as connection type. If using OpenVPN it will usually have TAP in the adapter name.
Once you find the correct adapter, choose that interface in qBittorrent (step 2 above).
4. Test your Binding
Finally, we need to make sure everything is working as expected.
- Connect to your VPN
- Open a 100% legal test torrent (like one of these linux distros)
- Check if it is downloading properly in qBittorrent
- Disconnect from the VPN
- Make sure the torrent stops in qBittorrent and doesn’t restart
- Reconnect to the VPN
- The torrent should start again
If you pass all of these steps, congratulations you’ve successfully setup VPN binding in qBittorrent.
If it doesn’t work, do your best to troubleshoot your settings and see where you went wrong. Most of the time, it’s because you chose the wrong interface to bind to.