uTorrent (and the BitTorrent-branded clone) is the most popular torrent client in the world. It also suffers from the inherent privacy vulnerabilities in all major torrent software.
This guide will show you how to encrypt your uTorrent downloads using a VPN and how to hide your real IP address from peers, making it extremely difficult for a someone to monitor your file-sharing activity.
Topics covered in this guide:
- Why you should care about anonymity and privacy while torrenting
- how torrents are monitored (p2p privacy leaks)
- tools you can use to improve torrent privacy
- The best tools for uTorrent privacy
- How to use a VPN with uTorrent/BitTorrent
- How to set up a Proxy in uTorrent
- Adding Encryption (without a VPN)
- Other privacy features:
- IP-bind
- Blocklists
Anonymous torrents: Why it matters
Torrent activity is public and easily traceable
You may not realize, but all torrent activity worldwide is easily traceable (and not only by your internet provider). Just as you can see all peers in a torrent swarm, anyone in a computer can monitor peers sharing a file, and see their unique IP address.
There are even websites like I know what you download that monitor thousands of copy-infringing torrent swarms worldwide and publish the IP addresses of peers.
Warning: If you visit IKWYD, it will display the files they’ve tracked to your IP address.
And of course, your internet provider (ISP) can see your torrent activity by using Deep Packet Inspection (unless you take steps to encrypt your utorrent traffic).
What you look like on uTorrent
Every major torrent client has a peers tab, which will show you the IP address, file status (and often the location) of each peers you’re sharing a file with.
And these IP addresses are a unique identifier that (unless you’re using a VPN) can be traced directly to your internet/mobile/broadband account.
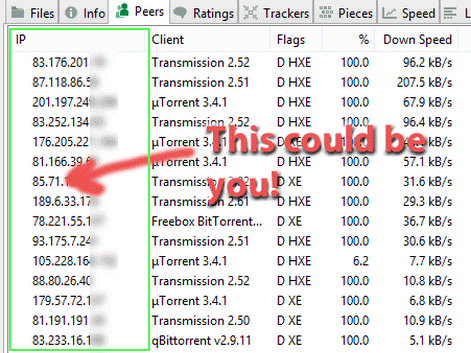
Above is a screenshot of the swarm for the pirate bay documentary film “TBP AFK.” The last few digits of the IP addresses from the swarm have been deliberately blurred by me (even though it is a public domain torrent) to preserve their anonymity.
Like these peers, you have no choice but to display your IP address (it’s how p2p peers connect to each other to share files).
But it doesn’t have to be your real IP-address!
That’s why smart file-sharers route their traffic through a VPN or proxy server, which will replace your IP-address with the one belonging to the remote server, shielding your identity.
You’ll learn how to set this up yourself later on in this guide.
VPN vs. Proxy: Which is tool is better?
The two best privacy tools for uTorrent are a VPN or Proxy. They can both help you hide your IP address from torrent peers, but they differ in ease-of-use and features (like encryption).
We’ll cover the basic differences below, but for a closer look, read: VPN vs. Proxy for torrenting.
Comparative advantages of VPN & Proxy
| VPN | Proxy | |
|---|---|---|
| Encryption | Strong Encryption | No encryption or weaker encryption |
| Impacted Apps | Encrypts/Routes traffic for your entire device | Routes traffic for 1 program or app |
| Changes your IP address | Yes (entire device) | Yes (for the program using the proxy) |
| Setup/Ease of Use | Standalone VPN App with extra features. Can be set up manually too. | Manual setup only |
| Speed | Slightly slower than proxy (encryption overhead) | Slightly faster |
| Torrent Client Compatibility | 100% | Some torrent clients ignore proxy settings (route traffic insecurely) |
To summarize the differences:
- A VPN is easier to setup and use
- Initial Proxy setup takes time, but then set-and-forget
- VPNs have strong, built-in encryption (most proxies don’t).
- Speeds are similar
- Some proxy servers block magnet links, VPNs work with all torrent links (including magnets).
Which to choose: For most users, a VPN is the best choice. We like adding a proxy as a 2nd optional privacy layer, but if you have to choose one or the other, go with a VPN.
Using a VPN with uTorrent/BitTorrent
There are 3 basic steps to use a VPN with uTorrent:
- Sign up for a torrent-friendly VPN service
- Configure VPN settings
- Configure uTorrent settings (optional)
1. Get a VPN
If you don’t already have a VPN subscription, you’ll need to sign up for one. It’ll cost between $3-10/month (depending on provider and subscription length).
No, there aren’t any good free ones. Yes, a quality zero-log VPN service is worth the price.
VPN Services I recommend:
- NordVPN ($3.99/month)
- Private Internet Access ($3.33/m)
- Cyberghost ($2.99/m)
- IPVanish – ($6.49/m)
Note: Pricing above is average per-month price for the best available offer (usually a long-term subscription).
2. Setup the VPN software
When you signup for a VPN service, you’ll either be emailed a download link or you’ll be able to download the VPN software directly from your account panel.
Download and install the software and login with your username/password.
Then, follow these steps to configure the software for better security while torrenting. Note: software will vary by VPN service, but most of them offer the features mentioned here.
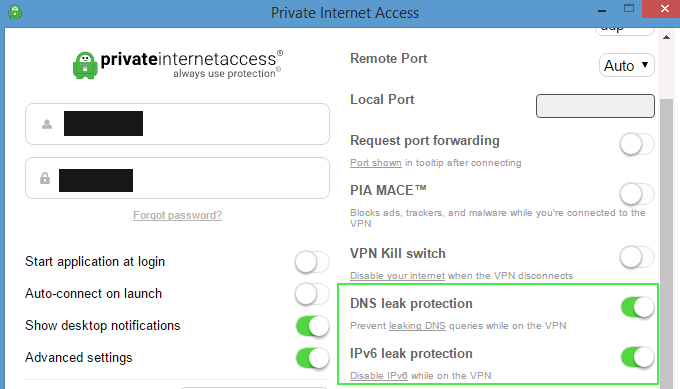
Turn on Leak-Protection
What’s Leak Protection: Operating Systems like Windows and OSX can be clunky, and don’t always interface pefectly with the VPN protocol. Sometimes this can allow an app to leak some information outside the VPN tunnel. Use your VPN-software’s built-in leak protection to avoid these issues.
How to enable it: Go to your software settings and look for checkboxes that mention:
- DNS Leaks / DNS Queries
- IPv6
Shown below is the setup for Private Internet Access.
Note: NordVPN, IPVanish and Cyberghost have always-on leak protection built into their software and it doesn’t need to be manually configured.
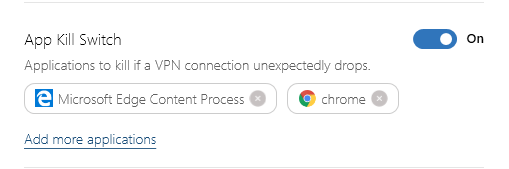
Enable the Kill-Switch (recommended)
What it is: Occasionally the VPN software can crash or the server can disconnect. If you’re torrenting at the time, your device will route your torrent traffic through your normal (insecure) connection. Enabling the VPN kill-switch will immediately stop all internet access if the VPN fails, preventing your data or IP-address from leaking to peers.
How to enable it: You’ll find the kill-switch in the settings menu of your VPN software. There are 2 types, and most VPNs offer one or the other:
- Internet kill-switch: Shut down all internet connectivity
- App kill-switch: Close specific apps if the VPN fails
Pictured is the kill-switch setting for NordVPN (both App & Internet), Cyberghost (Internet), and IPVanish(Internet):

Choose the right server location
Some VPN providers require (or prefer) that you only download torrents on certain server locations. It’s a good idea to check if your provider has a list of p2p-approved servers.
Even if your VPN ‘allows’ p2p in all locations, it’s usually a good idea to stick with servers in torrent-safe countries such as:
- Netherlands
- Switzerland
- Mexico
- Spain
3. Configure uTorrent settings
When using a VPN, there are a few uTorrent settings/options that you may want to change to optimize your security and download speeds.
Suggested tweaks:
- Turn off ‘forced’ protocol encryption
- Disable uTP and bandwidth management
- Disable UPnP and Port Forwarding
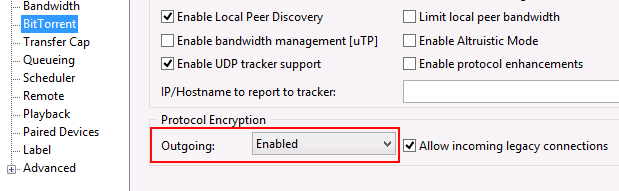
Turn off forced encryption
Your VPN’s encryption is much stronger than the RC4 transport encryption used by uTorrent. So if you require encrypted peer connections, you’re limiting speeds with no real benefit. Read our torrent encryption guide for more info.
Recommendation: Change ‘protocol encryption’ to ‘Enabled’ or ‘Disabled’ but not ‘Forced.
How to do it: Go to Options > Preferences > BitTorrent > Protocol Encryption
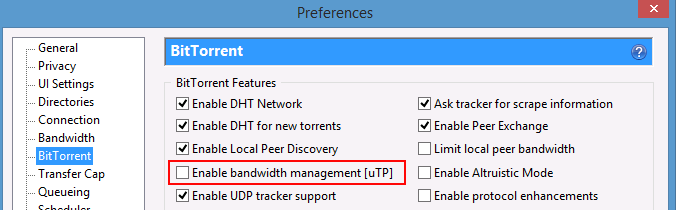
Disable uTP & Bandwidth Management
The Micro Transport Protocol (uTP) option in uTorrent’s settings is basically self-imposed throttling technology. It will ‘intelligently’ limit your torrent speeds to optimize your overall internet experience. In practical terms, however, this just makes your torrents unnecessarily slow.
Recommendation: Disable uTP and uTorrent bandwidth management
How to do it:
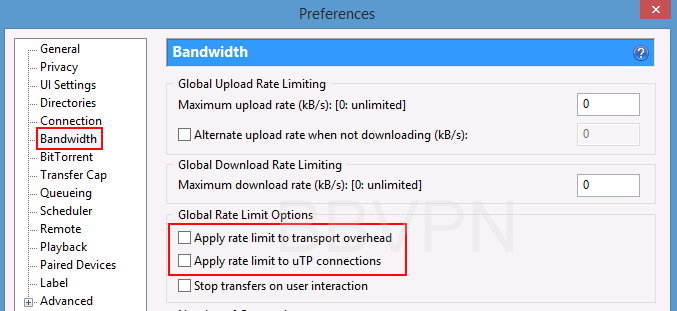
First, you can disable bandwidth management (uTP) altogether in Options > Preferences > BitTorrent:
Secondly, you can make sure bandwidth management doesn’t affect uTP connections in Options > Preferences > Bandwidth:
How to Setup a Proxy in uTorrent
If you’re not worried about throttling by your internet provider, you may opt for a proxy instead of a VPN. It’s a set-and-forget option that doesn’t require you to launch any software (like a VPN app) before starting a file-sharing session.
We’ll cover the basics here, but for a more in-depth guide read: How to setup a proxy in uTorrent/BitTorrent
Before we get started (what you need)
1: A zero-log proxy: Obviously you’ll need a subscription to a reliable, torrent-friendly proxy service. The best option is to choose a VPN service that includes SOCKS5 proxy servers, instead of trying to buy a standalone service.
Recommended providers:
- NordVPN (10 p2p-optimized locations)
- IPVanish (Netherlands)
- Torguard (3 p2p-optimized locations)
- Private Internet Access (Netherlands)
2: Make sure it’s a SOCKS proxy: This is the biggest mistake I see people make. They try to use some free HTTP proxy server they found online, only to get a violation notice from their ISP. Why? Because uTorrent ignores HTTP proxies for peer connections, so all peers see your real IP address. Woops!
All the providers mentioned above include SOCKS proxy service (good)
Configuring the Proxy in uTorrent settings
Follow these easy steps to setup your uTorrent proxy in under 3 minutes.
Before you get started, you’ll need your proxy login credentials (username/password). Consult your provider’s support team or knowledgebase if you have trouble finding this.
We’ll be using NordVPN as our example is this tutorial, but the steps are very similar for any other service.
Step #1: Go to uTorrent connection settings
To access this, go to: Menu > Options > Preferences > Connection (tab)
Once there you’ll see the port-forwarding settings as well as the proxy settings.
Step #2: Configure proxy server settings
Here you’ll enter the server address, port number, and login credentials specific to your provider (details for popular services can be found in the table below).
| Provider | Address | Port |
|---|---|---|
| BTGuard | proxy.btguard.com | 1025 |
| IPVanish | ams.socks.ipvanish.com | 1080 |
| Private Internet Access | proxy-nl.privateinternetaccess.com | 1080 |
| Torguard | proxy.torguard.org | 1085 |
Proxy settings for NordVPN:
NordVPN has 100’s of SOCKS5 server locations, so we’ll choose a p2p-enabled one in the Netherlands. Here are the details:
- Address: nl426.nordvpn.com
- Port: 1080
- Username/Password (same as VPN)
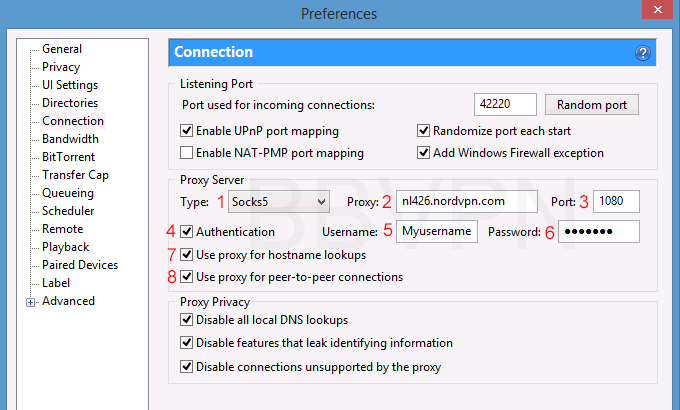
Correct Settings:
- Type: Socks5
- Proxy: nl426.nordvpn.com (or your proxy address)
- Port: Your provider’s port number
- Authentication: Checked (required to enter username/password)
- Username: your username
- Password: your password
- Use proxy for hostname lookups: checked
- Use proxy for peer-to-peer-connections: checked (IMPORTANT!)
Step #3: Proxy privacy settings
Torrent clients tend to leak identifying information (including IP addresses) if you don’t configure the proxy settings perfectly. So make sure you check all 3 boxes in this section:
- Disable all local DNS lookups
- Disable features that leak identifying information
- Disable connections unsupported by the proxy
That’s it. Setup is finished!
Troubleshooting proxy issues
Make sure to restart uTorrent after applying the settings. If you want to verify that your proxy server is working properly, use this tool to check your torrent IP address. Just click the ‘magnet link’ button and open the magnet link in uTorrent. The web page will then show the ip address that is associated with uTorrent. Verify that it is different from your web browser’s ip address with a tool like iplocation.net. If it is, you’re all set!
If for some reason it’s still the same IP as normal, double check all your settings and then if you still can’t find the issue, contact customer support.
uTorrent encryption settings
uTorrent has the option to add built-in protcol encryption. This encrypts outgoing connections (with compatible peers) and may help circumvent light throttling by your ISP or network firewall.
But it’s not a magic bullet, and it’s definitely not a substitute for VPN encryption.
What to know:
- VPN encryption is stronger: There’s no advantage to using uTorrent’s protocol encryption if you’re already running a VPN. Just set it to ‘Enabled’ but not ‘Forced’ for maximum peer availability.
- It doesn’t hide your identity: Encryption doesn’t prevent peers or trackers from seeing your IP address (the way most file-sharing is monitored).
- Consider using it if you don’t have a VPN: This is especially true if you suspect torrents are blocked or throttled on your network.
Optimal Settings:
- If you have a VPN: Set protocol encryption to ‘Enabled’ and allow legacy connections
- If you don’t use a VPN: Set protocol encryption to ‘Forced’ and don’t allow legacy connections.
For more information: Read our Torrent Encryption Guide.
Other uTorrent Privacy Features:
uTorrent has a few other optional features you may consider for privacy.
One is the ability to bind to a network interface or IP address (functions like a kill switch). This is a little tricky and not really necessary if you already use a proxy or a your VPN software’s built-in kill switch.
The other is the ability to block peers based on their IP address using a bulk block-list. We consider this to be an inefficient and ineffective approach to privacy, but you’re welcome to try it anyway. Just don’t consider it a valid alternative to a VPN.
How to bind uTorrent to an IP address
There is a little-known feature in uTorrent’s advanced settings that make this possible.
What it does: This option binds uTorrent to a specific local or external IP address (like your VPN’s IP). If your IP address changes suddenly, uTorrent will disconnect immediately.
How to do it: The best way to use this is to bind to the local IP address of your VPN connection, rather than the external IP address of the server. This way, you don’t have to change the setup every time you start a new VPN session.
Here’s how to set it up on Windows OS:
Connect to a VPN server: Open your VPN software and start a VPN connection (preferably to a torrent-friendly or p2p-legal server).
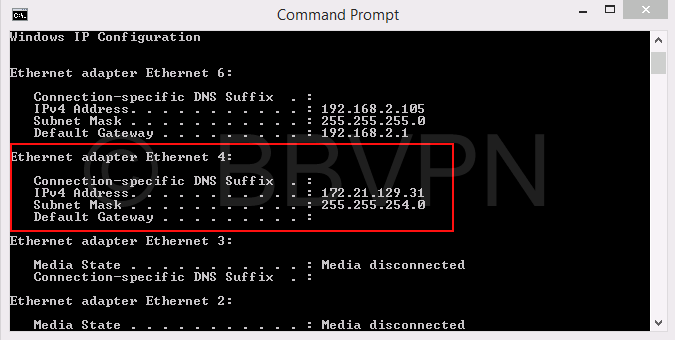
Find the local IP address of your VPN connection
When you start a VPN connection, it creates a network adapter that has it’s own IP address. We want to find it and bind to this IP.
- Go to start > run > cmd.exe
- Type ‘ipconfig’ and hit enter
- Look for the ‘Local Area Connection’ or ‘Ethernet’ IP address
On my computer, it’s ‘Ethernet 4’ with an IPv4 address of 172.21.129.31 (yours will be different). We’ll take this info to the next step.
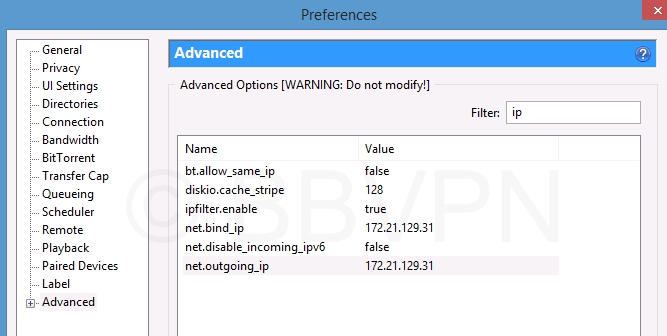
- Set the net.bind_ip and net.outgoing_ip in uTorrent
Go to uTorrent’s advanced settings: Menu > Options > Preferences > Advanced (tab)
Then simply fill in your local VPN IP address is those fields (the same value in both).
- Test your binding
Start a good legal test torrent like a well-seeded linux torrent, then disconnect from the VPN and see if the torrent eventually resumes downloading. If it doesn’t, your setup is correct. If the torrent never starts, you are binding the the wrong IP address.
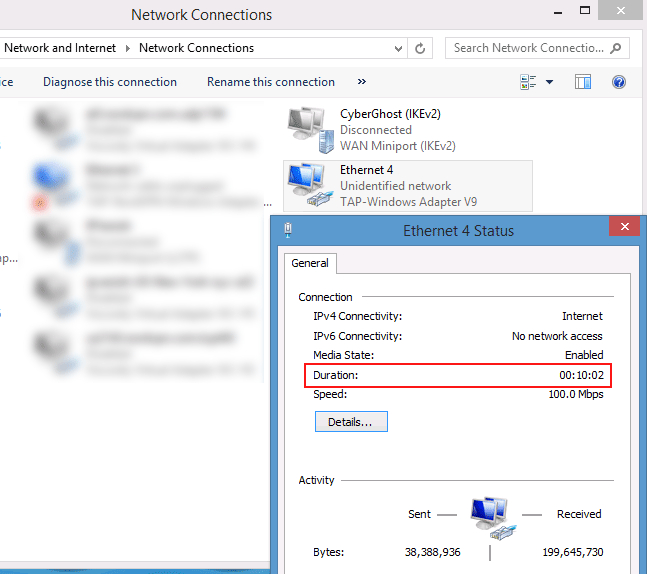
Troubleshooting Tip: If you can’t find the right interface to bind to, check the ‘Network Adapters’ section of your control panel and look for an active network adapter who’s Duration (connection time) is about the same as your VPN’s. Find this by right-clicking the adapter and going to ‘Status.’ It’s also a clue that it’s subtitle is ‘TAP-Windows Adapter’
Using a blocklist with uTorrent
If you want to use an IP address blocklist like PeerBlock or PeerGuardian (not something we recommend) it’s easy to setup.