
So you’re finally ready to anonymize your uTorrent downloads with a proxy? Welcome to the next level. It’s more fun here.
In this guide you’ll learn:
- The benefits of using a proxy for uTorrent
- The best non-logging (anonymous) proxy services for uTorrent
- How to setup a proxy in uTorrent (step-by-step)
- How to use uTorrent encryption without a VPN
Important Note:
This guide is for proxy setup only, not VPN. For maximum privacy you can use a VPN and proxy service together, for highly encrypted, anonymous torrents. A proxy alone will be sufficient for most users.
If you want the security of both together, read these VPN + Proxy setup guides:
WHY USE A PROXY FOR UTORRENT?
An anonymous torrent proxy makes it extremely difficult to trace your uTorrent downloads back to you. By routing all uploads/downloads and tracker/peer communications through a 3rd party proxy server, you can effectively hide your identity when using utorrent.
You see, every person sharing a torrent file can see the identity of every other person in the form of an IP address. Because your IP address is assigned to you by your Internet Provider, it can be directly traced back to you…
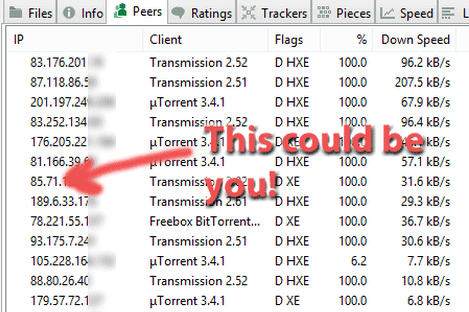
By using a proxy, you can change the IP address that is shown to your peers, and hide your true IP address.
When you use a proxy with uTorrent, the only ip address visible to your peers will be the IP address of the proxy server you are using. Your true ip address (the one assigned by your Internet Provider) will not be visible.
We recommend using a torrent proxy service (not a free public proxy) because:
- They keep no logs (no link between proxy ip address and your own)
- They allow torrents
- Faster speeds
- You know who owns the proxy server (don’t have to worry about hackers)
Important Tip: you should only use SOCKS5 proxies and never HTTP/HTTPs proxies for uTorrent. An HTTP proxy cannot handle torrent peer communications and will leak your IP address (BAD).
Frequently Asked Questions
Which Operating Systems is this guide for?
This will work for Mac (OSX) or Windows machines. UTorrent’s Android App doesn’t have proxy support.
Is a proxy as good as a VPN?
I believe a VPN is better but a proxy is still a good option, especially if your ISP isn’t throttling your downloads.
THE BEST TORRENT PROXY SERVICES FOR UTORRENT
We only recommend zero-log VPN and proxy providers. These companies allow p2p traffic on their network and promise not to record your IP address or traffic history.
1. NordVPN
![]()
NordVPN is our #1 preferred proxy provider for the uTorrent/BitTorrent client.
That’s because they’re the only VPN that includes SOCKS5 proxy service in more than 30 countries around the world, and 10+ P2P locations.
Also Read: NordVPN review & Torrent Guide.
Even better, NordVPN is offering over 70% off the monthly price when you buy a long-term subscription.
Get this deal: Get NordVPN from $2.99/month
30-day 100% refund policy
2. Private Internet Access
Private Internet Access is a great value, because they combine VPN + Proxy service at lower price than most VPN-only services.
With VPN servers in 30 locations and a very fast SOCKS proxy server in The Netherlands (perfect for torrents), PIA is everywhere.
Read: Our full review of Private Internet Access
And our PIA Torrent Setup Guide will show you have to use it with any torrent client.
7-day 100% refund policy
3. IPVanish

IPVanish consistently tests among fastest Torrent-friendly VPNs.
And now IPVanish includes zero-log SOCKS5 proxy service with every VPN subscription. This ultra-high bandwidth proxy server cluster is perfect for torrenting, and works flawlessly with uTorrent in our testing.
One drawback is that we’ve seen some issues with magnet links while connected to their proxy server.
Read: Our full IPVanish review (and Socks5 proxy setup instructions)
How to Setup a Proxy in uTorrent
Now we’ll show you step-by-step how to configure uTorrent to use a proxy server for all connections (maximum anonymity).
These setup instructions will work for any Socks5 proxy provider, but you have to make sure you use the correct settings that are specific to that proxy provider:
Some important things to know before we get started:
- Use a SOCKS proxy, not HTTPS: Even though uTorrent will let you configure an http proxy, it doesn’t actually support proxied peer connections unless you use a SOCKS proxy. The entire goal is to prevent peers from seeing your IP, so use SOCKS5.
- Each proxy service has it’s own settings: The address and port number will vary based on which proxy provider you choose. Contact the support team (or consult their documentation) to find the right settings for your service.
So before you continue, make sure you know have the following information for your specific provider:
- Proxy Address
- Port Number
- User Name & Password (assuming it has one)
Step #1 – uTorrent Listening Port Settings
- Open uTorrent
- Go to Menu > Options > Preferences (Or hit Ctrl+P)
- Go to the Connection settings (on the left side)
you should see a screen that looks something like this:
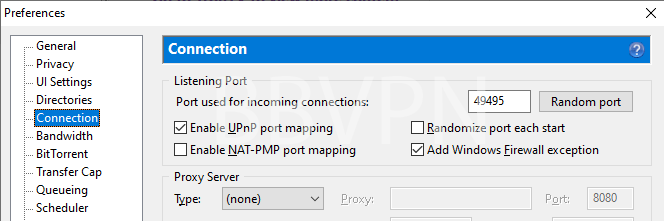
first, we want to make sure you have the correct Listening Port settings. This ensures that your router knows which computer to send your uTorrent traffic to.
The easy way to set up the listening port:
- Enable UPnP port mapping (must have a UPnP enabled router)
- Add Windows Firewall Exception
- (Optional) You can randomize the port on start if you want
If your router doesn’t support UPnP (or you don’t want to use it) we’ll need to do things the hard way.
The Hard Way:
- Disable UPnP and NAT-PMP port mapping
- Uncheck ‘Randomize port each start’
- Choose a port # for incoming connections
- Manually set up port forwarding for that port on your router.
STEP #2 – UTORRENT PROXY SERVER SETTINGS
Now we need to configure the actual proxy settings.
- Locate the ‘proxy server’ section (still under the ‘connection tab)
- Select your proxy type (for Torguard and PIA this is Socks5)
- Tick all 3 boxes (Authentication, Hostname lookups, Peer-to-Peer)
- Enter the proxy server address (may be URL or IP address. Depends on proxy provider)
- Enter Port # (depends on provider. For Torguard – use 1085 or 1090)
- Enter Username/Password – (Assigned to you by your proxy service)
For NordVPN, the settings will look something like this:
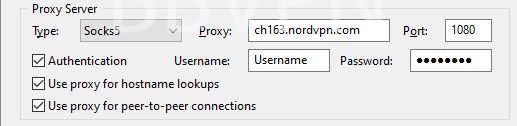
It’s important that you check all three boxes.
- Authentication: allows you to enter your username/password (otherwise it will be grayed out).
- Use Proxy for Hostname Lookups: Makes sure tracker connections use the proxy tunnel.
- Use proxy for peer-to-peer connections: Make sure p2p connections use the proxy tunnel (so peers see your proxy IP address).
STEP #3 – UTORRENT PROXY PRIVACY SETTINGS
The Proxy Privacy settings are the last section on the ‘Connection’ settings page. Check all three of the boxes.
it should look look like this:

Enabling these settings ensure that uTorrent won’t route any connections outside the proxy tunnel (which could leak identifying information). This disables the most common leaks.
STEP #4 – CHECK YOUR PROXY SETUP/VERIFY YOUR IP
Once your proxy setup is complete, it’s critical that you verify the proxy is working.
You need to make sure:
- You can connect to peers and download torrents
- Your torrent IP has changed to the proxy IP (not your own)
To complete step #2, use our How to check your torrent IP (for free) guide. It will show you step-by-step how to check what ip address is being shown to your torrent peers (and how to verify it’s different from your normal IP address).
STEP #5 – DHT SETTINGS (OPTIONAL)
DHT (Distributed Hash Table) technology allows you to find additional peers by asking your current peers if they know of any additional peers you aren’t already connected to. DHT means you don’t have to rely on a tracker to find peers, and you will have more available peers by using DHT, instead of just a tracker.
The downside of DHT is it’s another potential way your identity can leak. uTorrent should route all DHT requests through the proxy tunnel, but if your priority is maxim safety instead of maximum speed, you can disable it.
We will show you our recommended settings for DHT enabled, and Disabled:
To Access DHT Settings:
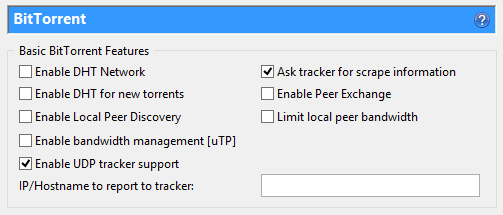
Still in the preferences menu (Menu > Options > Preferences) go to the Bittorrent tab (on the left)
To Enable DHT (Faster torrents, more peers)
Change your settings to look like this (don’t worry about the encryption section)
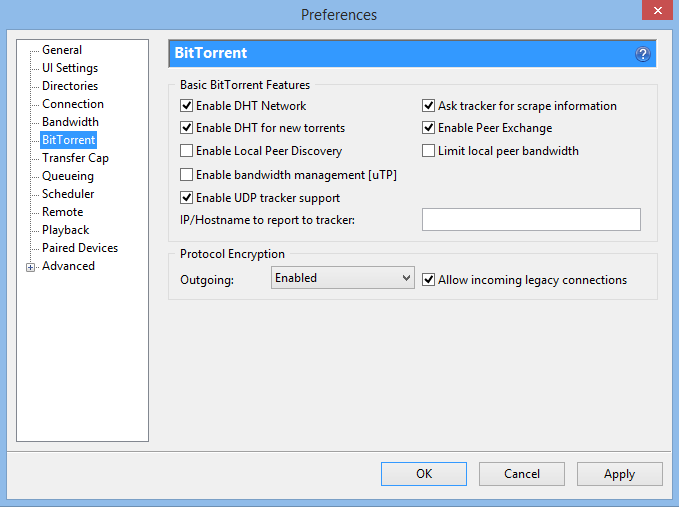
To Disable DHT (More Secure)
Change your settings to match these:
STEP #6 – UTORRENT ENCRYPTION (OPTIONAL)
Using encryption for torrents has several benefits:
- It stops your Internet Provider from seeing what you’re downloading
- It prevents torrent throttling (so your speeds should be faster)
There are 2 ways to add encryption to uTorrent:
#1 – Use a VPN
The best way, is to use a VPN with uTorrent. This gives incredibly strong encryption without reducing your number of available peers.
#2 – Use Utorrent’s Built-In Encryption ability
If you don’t want pay for VPN service, you can use uTorrent’s built-in encryption capability. The downside of this method, is if you want to force encryption for all connections, you will only be able to connect to other peers that have encryption enabled as well. This could reduce your total number of available peers by 75% or more.
If you still want optional encryption, but you don’t want to reduce your # of peers, you can ‘Enable Encryption’ without ‘Forcing’ it. This means you will use an encrypted connection when possible, but you still allow unencrypted connections to peers that don’t have encryption enabled.
Here’s how to enable encryption within uTorrent:
We’ll show two different setup options:
- Forced Encryption (More secure, reduced # of peers)
- Enabled Encryption (Less secure, all peers available)
Also Read: Our guide to torrent encryption
To access the Encryption settings, go to Menu > Options > Preferences > Bittorrent (tab) The encryption settings are at the bottom.
uTorrent ‘Forced’ Encryption settings

‘Enabled’ Encryption Settings

Final Thoughts & Tips
Using a proxy is definitely a step in the right direction for safer uTorrent downloads. And as long as you aren’t worried about ISP spying or throttling, it should work great.
Just remember to only use the SOCKS proxy protocol because HTTP proxies can’t handle p2p traffic (and will leak your IP address to peers).
Our recommended uTorrent SOCKS5 providers:
If you decide to risk a ‘free’ server that you found online, just make sure to test your proxy connection to make sure it’s properly obscuring your IP address.
Happy Torrenting!